- The Lighted Christmas Balls Themselves: (click on links to buy online)
- Chicken wireor poultry netting from a 2′ roll *
- 2 (or more) strands of outdoor mini-lights per lighted Christmas ball (100 count)
- 1 extension cord per lighted Christmas ball
- A clothes line (or other type of rope) to hang each lighted Christmas ball
* NOTE: We used typical chicken wire that has 1″ holes…because that’s what we had lying around. However, you could use poultry netting that has 2″ holes instead – it still provides the structure that your lights will need to be wrapped around, but not require as much cutting or man-handling.
- Tools: (click on links to buy online)
- Measuring tape
- Gloves
- Wire cutters
- Other – We used 2 methods to cut our chicken wire…the first proving to be easiest:
- Method 1: 2 saw horses, plywood, 4 pony clamps
- Method 2: 6 screwdrivers…with your surface being the ground
Instructions on How to Make Lighted Christmas Balls
Making lighted Christmas balls only involves 4 steps: 1. Cutting the wire into an appropriately sized rectangle; 2. creating a wire tube; 3. creating a wire sphere; and 4. wrapping lights around the wire sphere
These steps are quite intuitive…but to make them easier for you, I’ve provided you with some additional tips that we learned along the way. But if you’re not one for details…skip all the way to the bottom and you can download a printable 1-pager set of instructions.
1. Cut your wire into an appropriately sized rectangle:
- Size chicken wire (i.e., roll height):
- We learned the hard way…if you don’t start out with the right size chicken wire, you’ll either have to tuck a ton of excess wire into the interior of your balls…or have to settle with oblong lighted Christmas blobs…neither of which seem say “Merry Christmas!”
- That said, use a 2′ tall roll of chicken wire to get the typical size lighted Christmas ball…with a 14.5″ diameter.
- To get larger lighted Christmas balls, start with the 3′ or 4′ tall rolls of chicken wire.
- Make sure to put your gloves on right away…otherwise you’ll quickly be nursing paper-cut like wounds!
- Flatten out your chicken wire. This is made a lot easier if you use one of the following methods:
- Method 1: We found that the easiest way to flatten out your chicken wire is to stretch it over plywood and keep it in place with a pony clamp at each corner. To make it even easier, raise the plywood to waist level by placing it on top of 2 saw horses.
- Method 2: However, if you don’t have all of these things handy…you can simply roll your chicken wire out on the ground and then poke a screwdriver into the ground at each corner of your wire rectangle. Then poke 2 more screwdrivers into the ground just on the other side of where you’ll be cutting. That way…as you cut, the chicken wire will stay in place and not spring up and slice your face!
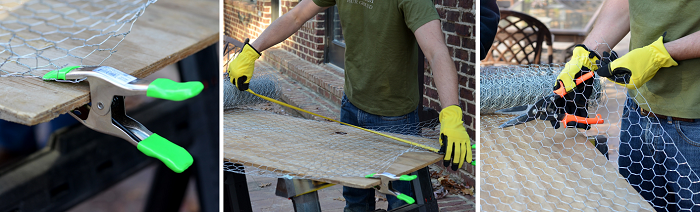
- After you’ve done that, all you have to do is make your measurement at 46″ (when using 2′ roll of chicken wire…you’ll need to go longer if you’re using 3′ or 4′ rolls of chicken wire).
- Cut the wire with your wire cutters.
- If you’re making more than 1 lighted Christmas ball, I’d recommend that you cut as many wire rectangles as you need…and just put them to the side until you start your next step.
2. Create a wire tube:
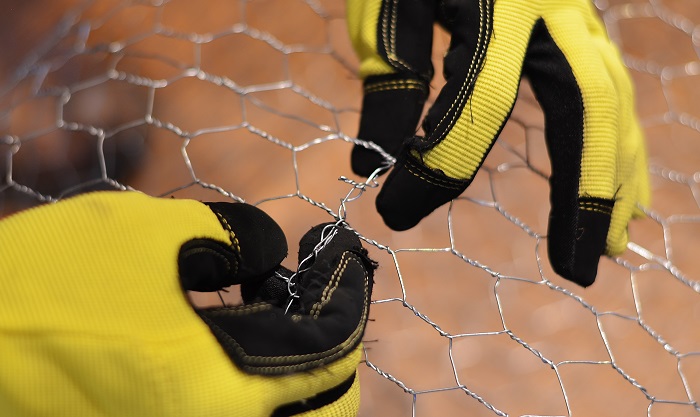
- With your gloves still on, fold the 2 cut ends together…lining up the edges…forming a wire tube.
- Using the loose wire ends, twist them together.
- You don’t need to twist the wire together about 6-8″ from either end, since you’ll be folding the ends of your wire tube together to make the wire sphere.
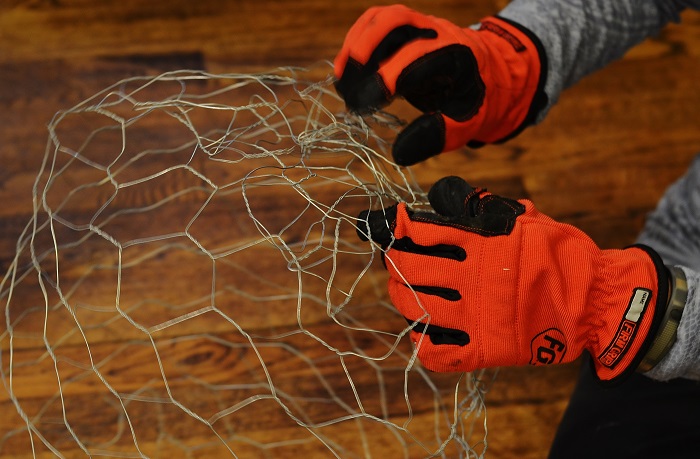
3. Create a wire sphere:
- At this point you have to put your perfectionist tendencies aside…as you will not be making a perfectly round ball, but rather something fairly close to being round.
- Kind of like you’re wrapping a present, create several dovetails from the open ends of your tube and fold them together.
- If you’d like and you have them handy, use twist ties to hold the dovetails together. I didn’t because I found that the chicken wire stayed fairly well in place.
- From there you simply mash in the squared edges you’ve created on the ends a bit to make your sphere a bit rounder. Again, it won’t be perfectly round…but once the lights are wrapped around it, it will take even better shape.
(This is what Poultry Netting with 2″ holes looks like.)
4. Wrap lights around the wire spheres:
- Starting with the male end of one of your strands of lights, poke it in and then back out of your chicken wire and tie a knot…so that the wire will stay in place (this is where using poultry netting with 2″ holes makes things a bit easier). I try to start (and stop) each strand of lights where I think the lighted Christmas ball would be best hung…makes things a bit neater and easier to hang.
- Now simply wrap the lights around the wire sphere…slightly rotating your sphere as you go, so that you get complete coverage with your lights. Note…you are not putting the lights in the sphere, but simply wrapping them around it.
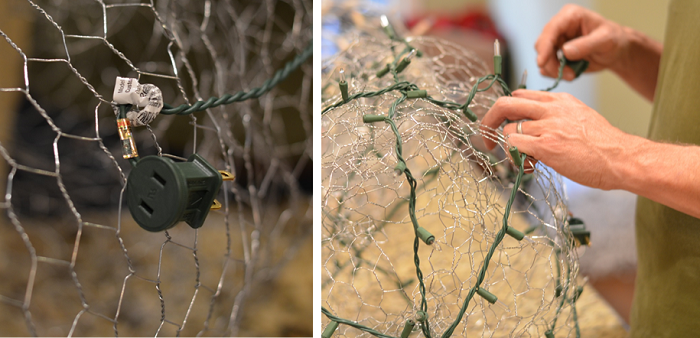
- Once you reach the end of your 1st strand of lights, thread it in/out of the chicken wire and tie a knot to keep it secure. Again, I try to begin and end my strand of lights close to the same spot so that the clump of plugs are all generally in the same place.
- If you’re using chicken wire that comes in 2′ rolls, you’ll need to add at least 1 more strand of lights. For the larger lighted Christmas light balls, I’d add 1 or 2 more strands of lights.
- Like with the first strand of lights, thread each end in/out of the chicken wire and tie a knot to keep it secure.
- I also try to make each connection inside the sphere so that it is camouflaged by the lights.
Congratulations! You’ve done it…you’ve created a lighted Christmas ball. If you’re making more…rinse and repeat.

Instructions on How to Hang Lighted Christmas Balls
How you hang your lighted Christmas balls depends on where you’re hanging them. Regardless…for safety reasons and to minimize things getting unplugged, make sure to use the clothes line to hang your lighted Christmas balls…keeping the tension on the clothes line rather than on the extension cord.
Here are a few methods you could try to get your lighted Christmas balls up and off the ground:
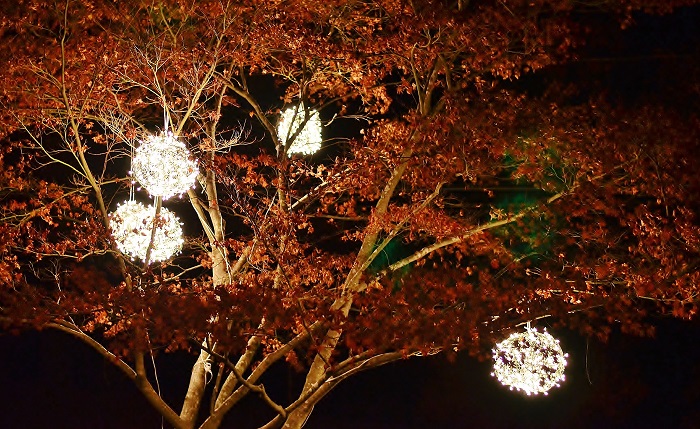
- Low limbs:
- Ladder: We hung our lighted Christmas balls on the limbs of a Japanese Maple that I could reach with a ladder. Still a bit cumbersome, but easier than the other methods.
- Cowboy it up: If you can’t reach the limbs with a ladder, but they’re still low enough…with the clothes line already tied to the lighted Christmas ball and the extension cord connected (also tied in a knot), simply swing it around as best you can and release it on the upswing.
- For both of these methods you’ll then simply secure your clothes line by tying it off on a limb and then wrap your extension cord around the limb a few times to take out the slack.
- Get the rope up and over: There are several ways you could get your rope up and over higher limbs.
- Tie the clothes line around a small water bottle or bean bag and throw or swing it up and over the limb.
- I’ve also seen a potato gun used quite effectively.
- Once the rope is around your limb, lower it to the ground…remove the water bottle or bean bag and tie it to the lighted Christmas ball. As I mentioned before, I try to tie the rope where I’ve concentrated all the other connections.
- Then feed the extension cord in/out of the chicken wire and tie a knot as you’ve done before…and plug it into the strand of lights.
- Using the clothes line (i.e., NOT the extension cord), pull the lighted Christmas ball into place.
- Secure the rope by tying it on a limb or nearby bush and gently maneuver any slack out of the extension cord.
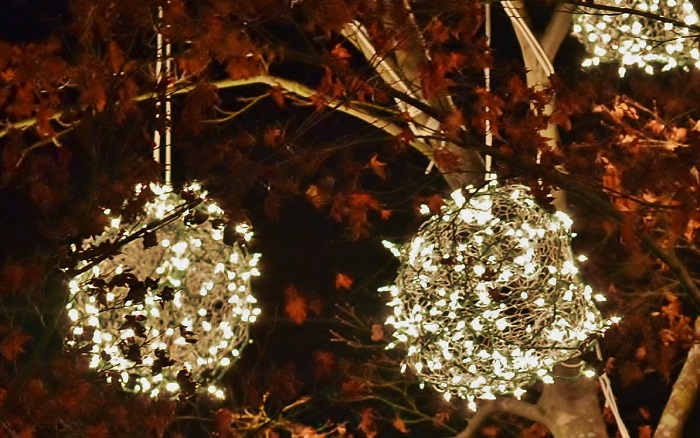
Voila…you’re done! Once nighttime falls, all you have to do is plug in your extension cord and enjoy the added Christmas glow your lighted Christmas balls provide to your outdoor spaces.

We’ve already made 5 lighted Christmas balls and will probably make several more. And we may even spread the Christmas love a bit more by hosting a lighted Christmas ball making get-together. Regardless, I hope this post helps you make some of your own…and if you do, please send me some pics…we’d love to share them.
Oh…and for an abbreviated 1-pager printable of these instructions, click here or on the image to the right.
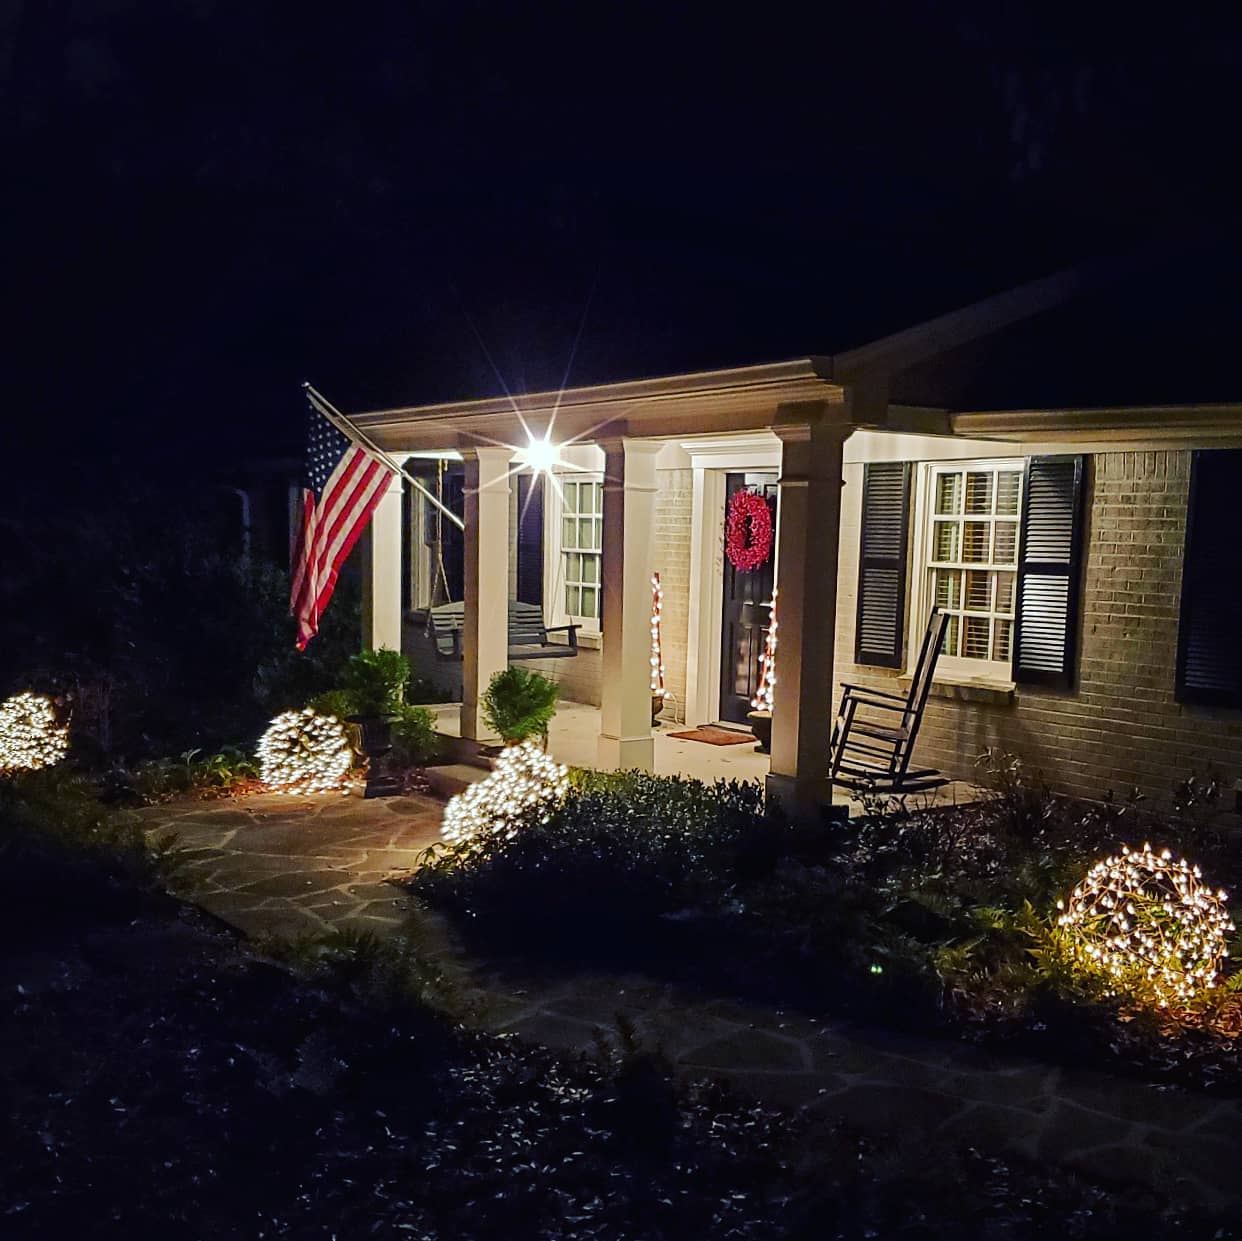
PS: And don’t feel like you have to always hang them from your trees. This year (2020) we simply placed them on the ground! Easy-peasy!
You may also enjoy these posts from RYG .
If you're not already subscribed to RYG and want to get periodic updates, links to new posts & other ground redeeming info . just enter your email address below. Easy as that!
18 Comments
Joyce Weatherly on December 8, 2014 at 7:12 pm These look so neat & cool. Can u use any color lights? Doug Scott on December 9, 2014 at 12:05 amThanks Joyce! And YES…by all means…knock yourself out with whatever colored lights…blinking or not. Going from nothing to something in our yard…we took a baby step with white, non-blinking lights. It all comes down to personal preference. Thanks for your question and for checking out RYGblog. Please come back. Take care, D.
Tina on January 15, 2016 at 8:16 pmAny ideas on how to make them more appealing during the day? I’m looking for something for my daughter’s wedding which is in the afternoon but will last until evening.
Doug Scott on January 16, 2016 at 12:08 pmHey Tina…thanks for reaching out. I understand what you’re saying. Lighted balls made out of chicken wire really aren’t much to look at when it’s light outside. So I have 2 suggestions. The first I blogged about in December…and that’s to make them out of folding wire balls…and I’d suggest simply wrapping the vertical wires with lights and not worrying about going horizontal with the lights. Would possibly get to the cleaner look you’re going for. Here’s a link to that post: https://redeemyourground.com/non-chicken-wire-lighted-christmas-balls/ The other suggestion is to use buy grapevine balls and wrap them with lights. That way you have something prettier to look at during the day. Here’s a link to where you can find some grapevine balls: http://www.egrapevinestore.com/grape-vine-balls/grape-vine-balls-two-piece I hope this helps…and let me know if you have any other questions. Take care, D.
KAREN BOMAR on November 14, 2016 at 6:49 pmHi Doug… I understand how to make the balls – that’s the easy part. What I don’t understand is how to get them all attached to power. Can you explain how you connected them? Did you use a lot of extension cords and plug them into a power strip or some other method? I’m having a hard time picturing how I would do this, especially if some are quite high in the tree. Thanks!
Doug Scott on November 15, 2016 at 10:22 amHey Karen…thanks for reaching out. Yes…the whole hanging of the lighted Christmas balls is the tricky part. And yes…it does involve a ton of extension cords.
Karen on November 15, 2016 at 10:59 am
Here’s what I do: 1. I’m strategic about the tree I hang them on…which for me is a large Japanese Maple at the center of my front yard. This allows them to be the focal point that I want them to be, and because of the trees structure, makes hanging easier. 2. At the same point on the ball that I tie the cord, I tie the female end of an extension cord. Which means you need to be strategic about where your last strand of lights ends. The cord is used for hanging…where all the tension is; and the cord, obviously, is the power source. 3. Once I place the ball where I want it (having a free-standing ladder, helper, and the JapMaple’s limbs makes this a lot easier and safer), I secure the cord and then I wrap the extension cords loosely around the limb, down to the base of the tree…making sure to use a dark color for both the cord and extension cord…so that they “disappear”…at least as best they can. 4. At the base of the tree I have an exterior grade power strip that actually sticks into the ground…where the lights are plugged in…which is then connected with a larger extension cord that’s plugged into an exterior outlet against my home. 5. I cover the cord with pinestraw until it reaches the sidewalk. Since my exterior outlet is on the other side of the sidewalk, rather than having the extension cord cross my sidewalk (i.e., trip hazard), I bring it to the outside of the sidewalk and follow it to my front porch. I have a step, so I tuck the extension cord there…thereby crossing the sidewalk where someone wouldn’t trip…and then plug it in. If you don’t have a step to tuck it under, you can simply put a welcome mat over it. 6. The exterior outlet is actually connected to a switch in my home, which makes turning the lights on/off that much easier. Another option would be to put it on a timer. Now, this may be all well and good for me because of the fact that I have an easier tree to hang them from. I have seen other posts/videos online where people have hung them from very high limbs of large oaks or pine trees. It appears that they use some sort of sling shot or potato gun to get them up there and then have fishing line/cord and extension cords hanging down/secured to the tree. At night you don’t see these cords, but during the day you do. Which is not the look I’m going for…and it doesn’t sound like you are either. If that’s the case and you don’t have a tree like I do, you could consider hanging them from a porch or other lower structure in your yard…or place them directly on the ground. I put some of the larger balls on the ground near the front porch…again, lighting an area of my yard/home I want showcased. And they look great too. I hope this is helpful. Please reach out if you have any other questions. Thanks again Karen…and take care, D.Got it! Thanks so much. I have a dogwood at the front corner of my house that will be perfect for these lighted balls. I plan on making them a bit smaller, maybe softball size or there abouts. I’ve tons of white lights left over from my son’s wedding this summer… I’m off to get supplies! Have a wonderful Thanksgiving and happy decorating!
Doug Scott on November 15, 2016 at 11:02 amGreat…so glad you found it helpful! And yes…smaller is probably better with a dogwood! And a wonderful Thanksgiving and happy decorating to you too! Take care, D.
KAREN BOMAR on November 29, 2016 at 8:11 pmHi Doug… I finally got around to making some lighted balls and hanging them in the dogwood. I’m pretty proud of them! Thanks again for the tutorial. What a fun project. I’ll add some more next year! I wanted to post a picture but I don’t see how. K
Doug Scott on December 1, 2016 at 4:31 pmAwesome…so glad you love them and that we were able to help in some way. The easiest way to share a pic is…if you’re on Instagram simply tag @rygblog when you post it…or you could email a pic to me and I can post it. Thanks Karen and Merry Christmas, D.
BONNIE on January 13, 2017 at 1:21 pmHOW DO YOU PLAN ON STORING BALLS TILL NEXT YEAR? i HAVE MADE LOTS AND NOW NEED TO STORE THEM FOR ANOTHER YEAR.
Doug Scott on January 14, 2017 at 4:09 pmBonnie, We store all of our lighted Christmas balls in the attic. With each I’ll wrap up their respective hanging cord and the extension cord in 2 separate balls. Where I have room, I hang them…and put the others on the floor below. Not certain if this helps at all…but that’s what I do with my 12 or so. Thanks for asking Bonnie and I hope you have a great rest of your weekend. Take care, D.
Karen Bomar on January 14, 2017 at 8:31 pmBonnie and Doug… I stored my balls in a big storage tote. Mine are about 8″ and they fit nicely. I made 7 of them initially but just finished another 4!
Doug Scott on January 15, 2017 at 6:00 amGreat idea Karen! I’ll have to try that w mine. I’m thinking that they may be too big to put more than 1 per tote…but I’ll see. Thanks for chiming in. Take care, D.

- Low limbs:
- Size chicken wire (i.e., roll height):
- Tools: (click on links to buy online)